Over this past weekend, Matt & I celebrated what I consider our first milestone as husband and wife: the one-month anniversary. After over 6.5 years together before making it official, we still take pleasure in those simple moments by spending our time doing what we do best….cooking together. It’s a way we share our love with each other and with everyone in our life that is important to us. And last night was no exception! Why go out when we could whip up an extra special dinner in the comfort of our own home?
As evident by my previous post, we do love some shrimp in our house. Living by the beach, seafood is simply a staple in our diet. (Just you wait….we do love fish too and I have quite a few good recipes to share on that topic later.) Shrimp is just so easy to make and you can incorporate just a few simple ingredients to make it delicious….like bacon! If you have package of bacon, a griddle, and some patience, then you are going to love this recipe!
And what goes better with shrimp than homemade pasta? Ever since I acquired my KitchenAid pasta press attachment, courtesy of Matt’s Aunt Lori (and family), cooking with box pasta sometimes seems as daunting as eating a McDonald’s cheeseburger. Granted, in a pinch it works just fine, but if you have the time to sift flour and knead dough, I suggest rolling up your sleeves and giving it a go! (And no worries if you don’t have a pasta press or a KitchenAid, there are plenty of recipes online to make it without a pasta machine! But I do recommend this dough recipe, it’s perfect to use and you can adjust as needed.)
It’s a great meal that looks like restaurant quality, but won’t break your bank to make! When it comes to big celebrations in life, sometimes the best way to honor that moment is not to go out, but to stay in and savor the memory from the comfort of your own home….with a tasty meal, of course.
Enjoy!
~ Jenny V
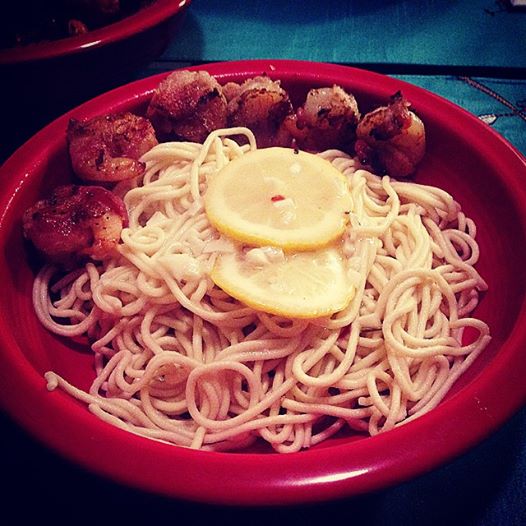
Bacon-Wrapped Shrimp with Homemade Pasta
Ingredients:
4-6 slices of bacon
2 dozen raw frozen shrimp, thawed and peeled
Sauce:
1 lemon, sliced
2 teaspoons minced garlic (or 2-3 cloves)
1/3 cup chicken broth
1/2 cup Cooking wine
2-3 tablespoons butter
2-3 teaspoons flour
Pasta Dough:
3 1/2 cups sifted flour
4 large eggs (Should be 7/8 cup. If it’s below, gradually add water until it is 7/8 cup)
1 teaspoon salt
1 tablespoon water
1) Start by pounding out bacon slices to make them a little thinner, then cut into pieces to wrap once around bacon. Place on skewer. Make it six shrimp to each skewer and set aside.
2) For pasta dough, in mixer using flat beater, add sifted flour and salt together, giving it a quick stir. Turn on lowest setting (Speed 2) and gradually add eggs and water until mixed, then switch flat beater to dough hook and mix on low for 2 minutes. Dough may be crumbly, but not too much. If it is super crumbly, gradually add water one tablespoon at a time until dough starts to form a ball. Remove and knead dough on wax paper or clean countertop until dough starts to get smooth and pliable, should be able to hold the shape of a ball. Break into walnut-sized balls for pasta press.
3) Start a pot to boil water. Attach pasta press attachment to KitchenAid and turn mixer to highest speed. Gradually place balls of pasta in press, using cutter on attachment to make strands of pasta as long or short as desired. Hang pasta on drying rack or on sheet pan lined with wax paper.
4) In a saute pan over medium-high heat, add butter and flour to make a roux, then add chicken broth, cooking wine, garlic, and lemon slices, bringing sauce to a boil, then lowering to simmer and cover.
5) On griddle pan over medium-high heat, place skewers of shrimp down, turning as bacon starts to brown and shrimp starts to turn pink, about 4-5 minutes. Once cooked through, remove from griddle and cover with foil on plate to keep warm.
6) Once water is boiling, add 1 teaspoon salt to pot and throw in pasta, stirring gradually until cooked through, about 4-6 minutes. Strain and return to pot, then add sauce over pasta and give a quick stir. Serve with shrimp on side.