It’s a little bit butternutty….

While I did it for the sake of Max’s little tummy at the time, adjusting to a dairy and soy-free life wasn’t easy.

With the constant need to read ingredients the process of eating became more of a challenge, more like an Olympic sport! Every item placed in the cart at the grocery store was scanned for any mention of dairy and/or soy. (I recommend the ShopWell app….saved me many times over at the grocery store and you can adjust it for just about any type of dietary restrictions.) I had to advise every waitress when I went out to eat of my dietary restrictions, sometimes even reading over a menu several times before I walked into the restaurant.

I lived with the feeling that it must have been frustrating for the cooks in the kitchen to have to adjust my meal, just because I didn’t want my son to cry in pain from any dairy or soy in my food that would get transferred to his breast milk. This frustrated me to the point that I really didn’t want to eat out at all until Max was cleared or we stopped breastfeeding. (After about nine months, I was able to finally go back to normal when Max started eating solid foods and showed no reactions as I reintroduced dairy and soy into my diet.)

But aside from that I will admit: I had missed dairy on occasion. There were moments I wished I could have a big slice of cheesecake, a plate of buttery Yukon Gold mashed potatoes, or a big bowl of fettuccine alfredo. Sure, there were alternatives like the Daiya products to give me the feeling that I was eating cheese or ranch dressing. (By the way, their pizzas and macaroni & cheese were pretty decent for not having any gluten, dairy, or soy in them.)

More than anything though, I really missed a good pasta in a cream sauce. Fortunately, I was able to locate this gem of a recipe courtesy of Cookie + Kate, which used pureed butternut squash in vegetable broth to replicate that decadence one craves when you order anything in a cream sauce. (And another added bonus aside from being healthy for all you non-meat eaters: it’s Vegan!)

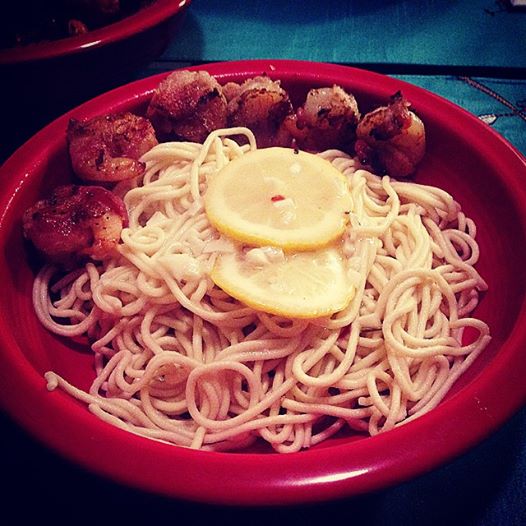
You can check out the recipe on the Cookie + Kate website here: Creamy Vegan Butternut Squash Linguine with Fried Sage. And if you’re not that big into linguine, I recommend using fettuccine as evidenced by the featured photo. It was a delicious substitution and I mean, who doesn’t love fettuccine in a cream sauce?

While I am not a vegan or vegetarian by any means, this dish at the very least satisfied my palette. With my diet back to normal, I would more than likely add some heavy cream and possibly some Parmesan to give it that extra kick of salt. Yet I learned that if you need to be healthy, healthy can be delicious.

And as always, enjoy!

– Jenny V

Advertisement

Francaise: Not just a chicken dish

While I am a healthy mix of nationalities (and according to my recent genealogy research a few I didn’t know about), I was practically raised by my dad’s side: mainly composed of English, German, and Italian family members. I can credit my family for being a key factor in my appreciation of food and cooking. And especially with Italian food, I have developed a rather particular palette. Because while I’m sure a good portion of the Italians I know would pick a tomato-based dish as their favorite, mine has always been and always will be Chicken Francaise. (Fortunately, the version of Francaise we made for this post does have tomato in it.)

In fact, I love Chicken Francaise so much that during my freshman year in college when the cafeteria had failed spectacularly in their attempt to make it (they added raisins and made it sweet….NEVER add raisins or make it sweet, it’s gross), I went home that weekend and asked my dad for an emergency dinner at one of our favorite Italian restaurants. I still shudder thinking of those raisins….I stress that they should NEVER be added to a savory, lemony dish…:::shudders:::…but I digress.

About three years ago, approximately April of 2013, Matt and I opted for takeout from our favorite local Italian joint. I remember the date because Matt encouraged me to order anything and everything from the menu for reasons unbeknownst to me. It was after the fact that he admitted that that was the day him and his mom were in a jewelry store picking out my engagement ring. That day in particular, I had a craving for Shrimp Francaise. I had tried the chicken, I had even tried a flounder version from one of our favorite seafood restaurants. But shrimp? Never.

Fast forward to a few years later, Matt and I decided to try making Shrimp Francaise to add some new dishes to our repertoire. The end result was a delicious lemony and buttery seafood dream, with some fresh sauteed spinach and cherry tomatoes that were bursting with flavor! Seriously, cooked cherry tomatoes–look into it and do it. And as for spinach, buy it fresh in bulk and you will yield many meals: a nice salad, a sandwich topping, and of course, cooked in Shrimp Francaise.

Fun plays on classic dishes are always a great way to spice up your culinary technique in the kitchen. This one is definitely a keeper.

Enjoy!

~ Jenny V


Jenn & Matt’s Shrimp Francaise 

1/2 lb. shrimp, cleaned & fully peeled

2 eggs, whisked

1 lemon, juiced

1 tablespoon lemon juice

1/2 lemon, sliced thin 

1 container cherry tomatoes

1-2 healthy handfuls fresh spinach

1/2 cup white cooking wine

1 cup chicken broth

1 – 1/2 cups flour

1 tablespoon flour

1 tablespoon butter

1-2 tablespoons paprika

1/2 teaspoon black pepper

Salt, to taste


Directions:

1) In a small bowl, mix in eggs and tablespoon of lemon juice. In a small pan, mix flour, paprika, and black pepper. Dredge each shrimp through flour mixture, then egg mixture. Place shrimp in pan over medium high heat with a little oil in pan. Brown on each side and let it cook almost all the way through, then remove from pan.

2) Into pan, add tablespoon of flour and butter to create a roux, then add white wine, chicken broth, squeezed lemon juice, and tomatoes. Before the tomatoes begin to burst, add the spinach and shrimp. Place lemon slices over top.

3) Cook until spinach begins to wilt and  tomatoes burst. Remove from heat, season with salt if desired, and serve over pasta.


A “Creamy Italian” twist on a summer standard

When summer hits, Matt and I are notorious for the cold salads, as you could tell with my last post about potato salad.

But our main summer salad? Macaroni salad.

We never make it the same way twice, always just grabbing for whatever is on hand in the fridge to try and utilize our food in different ways. Sometimes it’s as simple as onion and celery, other times I toss in some pepper with the onion and maybe some artichoke, and sometimes I pull out some of our frozen veggies and toss a little broccoli and peas in.

This week I felt compelled to make an Italian-style salad with pepperoni, genoa salami, red pepper, and fresh mozzarella. Now normally I would add Italian dressing to the mix, but if you’re like me, this salad is always subject to all the ingredients (minus the pasta) dropping to the bottom of the bowl. And the more you mix, the more it goes.

But not this time. I was determined to incorporate Italian flavors from the dressing and create a cohesive dish. And it hit me: Creamy Italian Dressing! When I make a mayo-based macaroni salad the ingredients never fall to the bottom. Instead, the mayo acts as a cohesive and creates the perfect blend ratio of pasta to its edible accoutrements.

And I must say, it was a success! To add a little more zip, you can always whisk in a little bit of the regular Italian dressing. Trust me, the Creamy Italian will still do its thing. More importantly, before you serve, always make sure to add just a little dollop more of the Creamy Italian Dressing. When sitting in the fridge, the pasta has a tendency to sop up a lot of the liquid, so that little dollop rejuvenates the dish a little bit.

As always, enjoy!

– Jenny V


Jenn’s Creamy Italian Macaroni Salad

1 box rotini pasta, cooked and drained

1/4 – 1/2 cup pepperoni, diced

1/4 – 1/2 cup genoa salami, diced

1/2 container fresh mozzarella, quartered

1/2 red bell pepper, diced

1/4 cup vidalia onion, diced

1/2 cup Creamy Italian Dressing

1/4 cup Italian Dressing

Italian Seasoning


Directions:

1) In a large bowl, add pasta, pepperoni, salami, mozzarella, red pepper, and onion. Mix.

2) In a 2-cup measuring cup, add Creamy Italian and Italian dressing. Whisk together until smooth.

3) Add dressing over pasta and mix thoroughly. Sprinkle Italian Seasoning over mixture, just a few taps, and mix.

4) Cover and refrigerate minimum 4 hours to overnight before serving.

Going “Swiss” on a classic….

If there’s one thing Matt knows about me, it’s that I have a love for certain foods.

Pickles, Fried Chicken, Sushi, Mashed Potatoes, Cauliflower, a nice rare Steak, Fresh Berries, and most importantly…..Macaroni & Cheese.

I know, not all my options are exactly healthy, per se, but I love my comfort foods just the same. There’s a decadence in them that I only indulge in when I am in need. (i.e., womanly issues, long day at work, etc.) I’m not one to reach for mountains of chocolate. I’m more the one to reach for a nice heaping bowl of mashed potatoes or homemade mac….and sometimes the occasional delivery of sushi.

But Macaroni & Cheese can occasionally get boring, so playing with the flavor combinations are quite fun when you get the chance.

For Valentine’s Day, Matt and I are not big on going out and spending an exorbitant amount of money on a meal we can make at home. No. In fact, we prefer to cook that decadent meal in the comfort of our home.

I had been toying around with the idea of a Bacon & Swiss Mac & Cheese for a while now. While I’m not a fan of cold Swiss (like my husband with a roast beef sandwich), melting it has yielded some tasty meals, namely Chicken Cordon Bleu. So why not to Macaroni & Cheese as well?

Adding the shredded Swiss to the roux and milk mixture proved to be a delicious change: the bite of Swiss was tempered with grated Parmesan cheese and the saltiness of the bacon. The combination provided decadent flavors to a rather inexpensive meal. (And Swiss is a nice alternative to Gruyere, which can run you about $30/lb….indulge only when it will make or break the dish!)

Sometimes our favorites need a little bit of a facelift….and the result can be quite delicious!

Enjoy!

~ Jenny V


baconswissmaccheese

Jenn’s Bacon Swiss Macaroni & Cheese

1 box elbow macaroni

1 package shredded Swiss cheese

1/4 – 1/2 cup grated parmesan cheese

2 1/2 – 3 cups milk

2 Tablespoons butter

1 – 2 Tablespoons flour

1/2 package bacon, cooked until crispy and chopped into bits

1/2 cup panko bread crumbs

1/8 block Velveeta, cubed

Salt

Pepper

Directions:

1) Prepare pasta to “al dente”. Drain well and place in large glass baking dish. Sprinkle almost all bacon over the pasta and save a little bit for topping, probably around 1-2 Tablespoons.

2) Pre-heat oven to 350 degrees. In saucepan on medium heat, combine butter and flour to create a roux, then gradually add in milk. When milk starts to thicken, add in Swiss , Parmesan, and Velveeta, stirring until cheese has melted. Add in salt and pepper to taste. Once at desired flavor, remove from heat. (**Save a little bit of Swiss and Parmesan for topping**)

3) Pour sauce mixture over macaroni & bacon, mixing thoroughly until sauce coats all pasta. Sprinkle remaining cheese, bacon, and bread crumbs over the top, then bake in oven for 30-40 minutes. Remove and serve.

Move over tortellini….it’s time for ravioli

With Memorial Day Weekend down and the beginning of summer season at the Jersey Shore, it’s also the beginning of more grilling, less indoor cooking, and my favorite….salads! Now I adore a good pasta salad, especially something with macaroni and tuna fish involved. Yet sometimes, I also find myself gravitating towards a frozen bag of tortellini and some Italian dressing for a quick and easy side dish!

Alas, there was no tortellini in our freezer upon checking our reserves for dinner tonight….instead just several bags of ravioli that have remained dormant and useful in a pinch during the cold weather. (Honestly, a package of frozen ravioli with a nice thick tomato sauce is a must when it’s freezing outside.) Without tortellini and trying to weigh out the options on hand, I couldn’t help but wonder….why not a cold ravioli salad? Like tortellini, it has cheese in the middle, it’s bite-sized, and the same flavor profiles would work.

Initially, I had attempted trying to locate a cold ravioli salad recipe with little luck. It seems everyone has gravitated towards tortellini instead and with a little bit of research, I located a handful of recipes that seemed way more complicated than it was worth. With a little bit of encouragement from Matt (and a pantry of unlimited resources, it seems), I created this recipe. As most  of you know from prior posts, I tend to draw inspiration from other recipes and vary the original dish to reflect our cooking style. But what does one do when there’s nothing to draw from? You improvise! And this improvisation was one delicious dish. (Matt and I ate over half of that bowl of ravioli with some delicious grilled chicken thighs seasoned in our curry powder–what a tasty way to end Memorial Day weekend, indeed!)

Dishes that are normally prepared hot can be just as delicious served cold. Never be afraid to give them a chance! Maybe next time I’ll throw in some fresh cauliflower, maybe even a nice spinach or grilled yellow squash instead of the broccoli. Or if you’re into the possibility of no vinaigrette and possibly some seasoning or crispy bacon bits, it’s worth a try too. This recipe is one take on a dish that should no longer be overlooked. Tortellini, you’re out and ravioli is in!

Enjoy!

~ Jenny V


Jenn’s Cold Ravioli Salad

1 package frozen mini ravioli (round or square, doesn’t matter)

1 package frozen chopped broccoli

1 small jar of marinated artichoke hearts, chopped (and hold onto the liquid from the jar, you’ll need it)

1/2 small onion, diced

Italian Balsamic Vinaigrette 

Directions:

1) Prepare ravioli as directed on the package. Use slotted spoon to remove from water and place into large bowl.

2) Prepare broccoli in the pasta water. Cook until bright green and separated, then strain and add to bowl with ravioli.

3) Combine all ingredients into bowl, including liquid from artichoke hearts. Add enough vinaigrette to lightly toss and coat. Cover and refrigerate for at least 4 hours. Serve.

Bringin’ home the Bacon(-wrapped Shrimp!)

Over this past weekend, Matt & I celebrated what I consider our first milestone as husband and wife: the one-month anniversary. After over 6.5 years together before making it official, we still take pleasure in those simple moments by spending our time doing what we do best….cooking together. It’s a way we share our love with each other and with everyone in our life that is important to us. And last night was no exception! Why go out when we could whip up an extra special dinner in the comfort of our own home?

As evident by my previous post, we do love some shrimp in our house. Living by the beach, seafood is simply a staple in our diet. (Just you wait….we do love fish too and I have quite a few good recipes to share on that topic later.) Shrimp is just so easy to make and you can incorporate just a few simple ingredients to make it delicious….like bacon! If you have package of bacon, a griddle, and some patience, then you are going to love this recipe!

And what goes better with shrimp than homemade pasta? Ever since I acquired my KitchenAid pasta press attachment, courtesy of Matt’s Aunt Lori (and family), cooking with box pasta sometimes seems as daunting as eating a McDonald’s cheeseburger. Granted, in a pinch it works just fine, but if you have the time to sift flour and knead dough, I suggest rolling up your sleeves and giving it a go! (And no worries if you don’t have a pasta press or a KitchenAid, there are plenty of recipes online to make it without a pasta machine! But I do recommend this dough recipe, it’s perfect to use and you can adjust as needed.)

It’s a great meal that looks like restaurant quality, but won’t break your bank to make! When it comes to big celebrations in life, sometimes the best way to honor that moment is not to go out, but to stay in and savor the memory from the comfort of your own home….with a tasty meal, of course.

Enjoy!

~ Jenny V


baconwrappedshrimp

Bacon-Wrapped Shrimp with Homemade Pasta

Ingredients:

4-6 slices of bacon

2 dozen raw frozen shrimp, thawed and peeled

Sauce:

1 lemon, sliced

2 teaspoons minced garlic (or 2-3 cloves)

1/3 cup chicken broth

1/2 cup Cooking wine

2-3 tablespoons butter

2-3 teaspoons flour

Pasta Dough:

3 1/2 cups sifted flour

4 large eggs (Should be 7/8 cup. If it’s below, gradually add water until it is 7/8 cup)

1 teaspoon salt

1 tablespoon water

1) Start by pounding out bacon slices to make them a little thinner, then cut into pieces to wrap once around bacon. Place on skewer. Make it six shrimp to each skewer and set aside.

2) For pasta dough, in mixer using flat beater, add sifted flour and salt together, giving it a quick stir. Turn on lowest setting (Speed 2) and gradually add eggs and water until mixed, then switch flat beater to dough hook and mix on low for 2 minutes. Dough may be crumbly, but not too much. If it is super crumbly, gradually add water one tablespoon at a time until dough starts to form a ball. Remove and knead dough on wax paper or clean countertop until dough starts to get smooth and pliable, should be able to hold the shape of a ball. Break into walnut-sized balls for pasta press.

3) Start a pot to boil water. Attach pasta press attachment to KitchenAid and turn mixer to highest speed. Gradually place balls of pasta in press, using cutter on attachment to make strands of pasta as long or short as desired. Hang pasta on drying rack or on sheet pan lined with wax paper.

4) In a saute pan over medium-high heat, add butter and flour to make a roux, then add chicken broth, cooking wine, garlic, and lemon slices, bringing sauce to a boil, then lowering to simmer and cover.

5) On griddle pan over medium-high heat, place skewers of shrimp down, turning as bacon starts to brown and shrimp starts to turn pink, about 4-5 minutes. Once cooked through, remove from griddle and cover with foil on plate to keep warm.

6) Once water is boiling, add 1 teaspoon salt to pot and throw in pasta, stirring gradually until cooked through, about 4-6 minutes. Strain and return to pot, then add sauce over pasta and give a quick stir. Serve with shrimp on side.